Showing posts with label Family. Show all posts

Friday, December 16, 2011

Winter Grass

Winter Grasses I have to admit that I am okay that our lawn is dry and brown right now…it is way better than having green grass underneath snow.  I think the birds do fly south for the winter because I still do see birds and I hear them every morning.  The ducks have been happy swimming in the pond near our home.  This card was is another card that will go into my MIL’s box of cards.  It was inspired not only by what I see out my front window (Dried Grasses), but my overall card was inspired by a card over at Splitcoaststampers that I really like.

Can you see the sparklies? I’m really enjoying how the bird’s tail is extended by the use of the stencil.  I know it is hard to tell in the photo, but the bird and the tail are sparkly with shimmer mist.  So fun when the light captures it!

Winter Grass Close Up Stamps: Established Elegance, Happy Harmony(Retired) 
Paper: Very Vanilla, Soft Suede, Early Espresso
Ink: Marina Mist, Early Esspresso
Accessories: Hemp Twine, Seam Binding – Crumb Cake, Very Vanilla, Early Espresso 1/8” Taffeta, Vicotria Crochet Trim, Basic Pearls
Tools: Paper Piercer, Mat, Vintage Ornaments Decor Stencil, Sponge, Mini Glue Dots, Tombow Multipurpose Adhesive, 1” Circle Punch, 1-1/4” Circle Punch, Crimper, Shimmer Mist, Spritzing Tool, Distressing Tool, Bird Builder Punch, Corner Rounder
Technique(s): Direct to Paper, Sponging, Seam Binding Rosette, Shimmer Mist

Thanks for stopping by!  Enjoy!

Most products can be purchased via my online store.

Wednesday, December 14, 2011

Stampin’ Up! Stamp Set Flashback

I’m still working on that box of cards for my MIL.  It is nice to have sketches to follow when you are making a box of individual cards. I have two cards to share with you today.

I spent some time cleaning up my stamp room yesterday.  As I only had a 4 inch square of usable space left to create I figured it was about time to get busy cleaning. As I was cleaning I came across some of my Stampin’ UP! fabrics and some of my favorite retired stamp sets.  It’s amazing the things that you find when you’re better organized!  *smile*

Close Up Thank You This first card uses the Mojo Monday 219 sketch from this week.  I’ve been wanting to incorporate fabric on a card and this card does just that!  I decided to add various textures to the card, so you’ll notice the fabric is bunched in places rather than simply laying flat like paper.   I was able to create that texture, by using the Stampin’ Up! multipurpose adhesive sheets.  It makes you want to touch it, doesn’t it? 

Full Card Thank You Stamps: Circle of Friendship (Retired)
Paper: Very Vanilla, Basic Black, Newsprint Designer Series Paper(retired)
Ink: Jet Black Stazon 
Accessories: Timeless Portrait Designer Series Fabric, Hemp Twine, Vintage Brads
Tools: 1-3/8” Circle Punch, 1” Circle Punch,Decorative Label Punch, Lace Ribbon Border Punch, Cropadile, Dimensionals, Multipurpose Adhesive Sheets 
Technique(s): Frayed Twine

Close Up Wishes This second card uses the sketch challenge for the week from Splitcoaststampers. This card is a non-standard 3.25” x 5.5” card.  It was fun creating with some of my well loved images from the past years.  I know my MIL will love both of these!

Full View Wishes Stamps: Well Worn Words (Retired), Echos of Kindness(Retired), Fabulous Phrases
Paper: Red Riding Hood Red, Old Olive, Very Vanilla
Ink: Jet Black Stazon, Red Riding Hood Red, Old Olive
Accessories: Vanilla Hodgepodge Hardware (Retired), Crumb Cake Seam Binding
Tools: Aqua Painter, Big Shot, Vintage Wallpaper Embossing Folder, Corner Rounder Punch, Small Oval Punch (Retired), sponge
Technique(s): Sponging, Big Shot Embossing

Thanks for stopping by!  Enjoy!

Monday, December 12, 2011

Flowers of Best Wishes

I’m still working on a box of cards for my Mother-in-Law.  I’ve become grateful for her December birthday because I have the ability to switch up her birthday and Christmas gift.  That will give me some extra time in getting all the cards done!

I’m sharing with you today, one of the cards that  will be going in her box for Christmas! Front View This card was inspired by rectangles that I saw stamped on cards.  Amazing how your mind moves when you are creating!

How did I do that?

The top layer was created by adhering various rectangles that were sponged and distressed along the edges to a plain piece of Very Vanilla. This layer was then popped up with dimensionals.

Side AngleThe flower was created by crumpling 5 stamped scallop circles, sponging them and snipping between each scallop almost to the center.  A beautiful neutral glitter brad was inserted in the center

Stamps: Sincere Salutations, Established Elegance
Paper: Very Vanilla
Ink: Soft Suede, Cherry Cobbler 
Accessories: Cherry Cobbler Quilted Ribbon
Tools: Distressing Tool, Sponges, Scallop Circle Punch, Paper Snips, Dimensionals
Technique(s): Sponging

Thanks for stopping by!  Enjoy!

All Stampin' Up! Products are available through my online store!

Tuesday, October 4, 2011

Masculine Birthday Blinged with Metal and Rust

Noah Bday 2011 005 There are a couple times a year that I need to create Masculine Cards…Birthdays are just one of those occasions.  I am just like you…trying to figure out which of my stamps to use so that the card doesn’t end up with a flower on it!  *smile*

I’m sure my darling son, Noah, wouldn’t mind either way, but because he loves the Extreme Elements stamp set to make cards for his friends…it was an easy selection this time! He is a typical boy and Blue is his favorite color, so I decided on one of the newest blues, Marina Mist.  Now as blue is not one of those colors that I drift to, I used the Color Coach to help me out!  I love that super tool to help me select the perfect colors, Marina Mist, Cajun Craze and Crumb Cake! I loved these three colors that I selected and the Cajun Craze makes a perfect rust when you use the Direct to Paper technique.

Noah Bday 2011 003Now, if you are like me you have a bunch of cool embellishments that you are hoarding for that perfect card!  Any type of metal is perfect for a masculine card.  I loved using the game spinner on his card as an element of fun even though it has no use except to introduce movement into the card.

Noah Bday 2011 004 So, do you love how I used the stamp set, Number It, for his age? I have had so many ideas pop in my head for this cool number set!  It is perfect for labeling items around your house too! 

Stamps: Extreme Elements, Netting, Number It 
Paper: Marina Mist, Cajun Craze, Crumb Cake, Very Vanilla Cardstock
Ink: Marina Mist, Cajun Craze, Crumb Cake Cardstock
Accessories: Linen Thread, Dimensionals, Snail Adhesive
Tools: Color Coach, Paper Snips, Vintage Trinkets (Sm Safety Pin), Game Spinner Hands, Ornament Punch
Technique(s): Direct to Paper, Sponging

Thanks for stopping by!  Enjoy!

Visit My Online Store


Happy Birthday, Noah!

Friday, April 8, 2011

Scrapped Cards

Scrapbooking and cardmaking walk hand in hand in this Spring Break inspired thank you card.  Every other year we take a vacation with my in laws.  This year we visited Cancun.  It was a first for both me and my son.  The Riviera Maya area was so beautiful and the water so blue and the sun so hot!  This card was created for Nana and Papa for sharing this wonderful time with us where dreams are made true.

Vacation Thank You 001 The card is meant to be kept as a remembrance of our precious time together.  The layout of this card followed the Mojo Monday Sketch Layout for the week.  

Stamps:   Fabulous Phrases
Papers:   Bashful Blue, Sahara Sand, Taken with Teal Holiday Print Designer Series Paper (Retired), Whisper White, Photos 
Ink:  Jet Black Stazon, Sahara Sand Stampin’ Write Marker 
Accessories:  Hemp Twine, Build a Brad
Tools: Stamp-a-ma-jig, Itty Bitty Shapes Punch Pack, Spritzer Tool
Techniques Used: None

Thanks for stopping by!

Enjoy!

kealsiggy

Thursday, March 17, 2011

Time Flies

MOJO182 I haven’t bought a birthday card in almost 6 years…Wow! I’m coming up on six years as a Stampin’ Up! Demonstrator next month!  Okay, except for that one time at band camp when I…But, really time really does fly. I thought I would get some birthday cards made before the day actually shows up and I am cardless, again.  Why is it that we can make cards whenever we want but those birthday cards are the last ones that get made, usually right before the big day.  Well, now that I’m a long way off from family, I’ve got to plan ahead. 

Being my almost Stampin’ UP! birthday, I thought something new was in order.  This card was made for the Mojo Monday 182 MOJO182 Close UpChallenge.  It actually started out as a masculine card, but I ended up adding a pearl to the tag.  I think it now makes this a  lady card.  What do you think about pearls and guys….hmmm, maybe I can find a bit of scrap metal and add it instead.  *smile*

Everything was sponged with Soft Suede and spritzed with the Spritzer Tool using the Soft Suede Stampin’ Write Marker.  The Concord Crush Ribbon had white bands on the end and those were sponged to better blend with the card.

Stamps:   Sense of Time, Notably Ornate, On Your Birthday, Woodgrain Background
Papers:   Soft Suede, Crumb Cake, Very Vanilla, Concord Crush
Ink:  Soft Suede, Concord Crush, Soft Suede Stampin’ Write Marker
Accessories: Concord Crush Ribbon, Vintage Trinkets, Antique Brads, Metallic Eyelets, Pearl, Hemp Twine, Stampin’ Dimensionals
Tools: Paper Snips, Spritzer Tool, Crop-a-dile, Craft Knife, Snail, Stampin’ Sponge
Techniques Used:  Distressing, Sponging

Enjoy!

http://lindakeal.stampinup.net

Tuesday, February 15, 2011

Coffee or Tea for Two

This is a cute little project that I came up with last night.  It  Game Boarduses Stampin’ Up!’s beautiful Designer fabric and images along with some items that you may have around your house – bottle caps.  My bottle caps were newly acquired, but this project is perfect if you want to repurpose some of those that you may have collected and saved. I had been collecting these little pieces of “canvas” or bottle caps, for a long time and when we moved I finally decided that they would end up in the recycling bin.  *sigh*  But, as luck would have it, a friend sent me these bottle cap beauties to play with!

Packaged  Game SetThis little set includes a fabric tic tac toe game board that  doubles as a little storage bag to hold the game pieces.  One of the game pieces also doubles as the bag tie to keep the pieces inside.  I punched a small hole using a handheld punch and inserted some linen thread through the bottle cap.  The piece comes off completely and can be used as the final piece when playing. 

If you want to make your own little game board, cut nine 2-1/2” x 2-1/2” squares of coordinating fabric (5 squares in one of the colors and 4 in the other).  All seams are 1/4”.  The back of my game board is a 6-1/2 square of muslin, but you could use one of your coordinating fabrics.  I figured the muslin would show my name and copyright stamp easier! (see pages 144-145 of the current catalog for these customized stamps)   If I was more awake when I was making the bag, I would have made a drawstring tie, but I just tied the linen thread with the attached bottle cap to keep the game pieces inside. Easy Peasy!
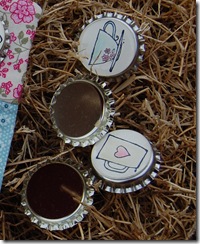
Game Pieces You’ll need nine bottle caps for this game set. The 1” punch fits PERFECTLY on the bottle cap.  Decide on two different images.  For me this was the hardest part, choosing which stamps to use.  Stamp 5 of one image and 4 of the other.  That made me super happy!  **happy dance** Snail Adhesive worked great to keep the paper attached to bottle cap.  This may work differently based on how much humidity you have where you live so test out some of the other Stampin’ Up! adhesives if you are not getting the same results. I placed the self-adhesive covers on top of the watercolored images and I was done.

I really thought this project would be great for a party favor maybe at a Tea or a Shower.  But honestly it would be great as an anytime sugarless gift for a teacher, neighbor friend or loved one!  Don’t you think this would be a fun sugarless Halloween treat with spiders and bugs? Great for travel too!

More than Tic Tac Toe: As I was playing around with this set, I also came to think about another game to play similar to horseshoes.  Bounce the bottle cap on the table and try to get it on one of the squares. **Any of you that thought of “quarters” get back on track.  This is a family game! ** Get two points for getting it to touch the center square or one point on any of the other squares.  Be creative and come up with other games to play with the pieces available. Make sure to include instructions for the recipient!

Stamps:   Morning Cup
Papers:  Very Vanilla 
Ink: Jet Black Stazon, Rose Red, Baja Breeze, River Rock
Accessories: Linen Thread, Bottle Caps with Self-Adhesive Covers, Springtime Vintage Designer Fabric, Muslin 
Tools: 1” Circle Punch, 1/16” Handheld Punch, Blender Pens, Snail Adhesive, Sewing Machine
Techniques Used:  Water Coloring

Enjoy!

Need Stampin' UP! Supples?  Contact me today!


Sale-a-bration is underway!  Order your Stampin’ UP! products now and earn free products.  Call or email me now with any questions or to place your order.

Tuesday, February 8, 2011

Card Making and Photography

When you sit down to Image Close Up make a card does it take you forever?  Do you have all your stamps out and all kinds of paper and you keep thinking about it?  Well, today was not one of those days for me! I saw this fun challenge over at Splitcoaststampers to create a Clean and Simple (CAS) card with these colors…(Whisper White, Poppy Parade, Peach Parfait and Daffodil Delight), and then I was done.

Full Card Okay, so I thought about it, grabbed my paper and supplies in about 5 minutes and then put this quick and simple card together in about 2 minutes.  It took me more time to photograph it then to put it together.  The sun was too bright….okay, I know all of you that are living in the middle of a snowy heap and gray skies are not happy with me saying that, but it’s true.  Have you ever had a problem taking a photo in bright direct sunlight.  It washes a lot of the color away…oh the trials and tribulations of living in a warmer climate, I guess, LOL! 

Project "Toucher" Then, this guy couldn’t keep his nose away from the card while I was trying to photograph it.  I think it looks like he is saying “Who Me?”  Do you have a pet that must “touch” your pieces of art when you are busy photographing them?  If I look back at some of my old photos, I’m sure I could find a couple puppy noses.

Stamps:   Inspired by Nature, Tiny Tags
Papers:  Whisper White
Ink: Jet Black Stazon 
Accessories: Dimensionals
Tools: Poppy Parade, Daffodil Delight, Peach Parfait Stampin’ Write Markers, 1-1/4” Square Punch 
Techniques Used:  Spotlight

I hope you’re having as good a day stamping as I’m having, but a better day taking photos!

I’ll try to get some photos of what I’ve been spending a bunch of time on later in the week! If you’re interested in stamping on wooden items then make sure you check back!

Enjoy!

Need Stampin' UP! products?  Shop my online store.

Sale-a-bration is still going on!  Order your Stampin’ UP! products now and earn free products.  Call or email me now with any questions or to place your order.

Tuesday, August 24, 2010

Back to School

Howdy y’all,

I guess I should start out with some southern lingo, so you know I’m starting to adjust here in the south.  Noah has picked up on some of the word choice already and it sounds strange coming out of him.  ;) 

Click to view larger photoSchool started this week.  I’m excited and sad at the same time.  Noah has been so helpful since I broke my elbow and I’ve come to depend on him to help me out.  On the other hand, I’m excited because now I’ll have a bit more time to devote to stamping and getting some stamping activities going again!  To begin, I wanted to share a card that I gave to Noah yesterday to celebrate the start of his 4th grade year!

The summer mini is almost gone so I have to share some of my faves before they disappear and the Holiday mini takes over.  I know I’m behind the times, but better late than never, right?  One of my favorite stamp sets was the rough type alpha in Clear block.  I love that those tiny letters can be lined up to spell almost anything. Can you see the “rocks” in the lower left corner? How cool is that?!  Line up and stamp once! Did you notice that I forgot to stamp “grade”?  I just noticed when I was typing this out.  I guess I am human, huh, although it kinda makes sense even though I forgot part of the words. LOL!

This card uses Noah’s favorite colors, so it is actually a little “bright” for me, but it totally screams “LET’S CELEBRATE”, don’t you think? ;) Don’t you love how colors can emit emotions?  Anyhow, the Extreme Elements stamp set is a great set to create a collage and is perfect for kids to teens to adults!  Noah told me that he likes the splatter stamp because it looks like slime hitting the wall…what else would you expect from a 9 year old?  LOL! The number and letters were created using the Go Go Boots Medium Sizzlets dies for the Big Shot.  Forgive me, but the big red star is from the retired “A Little Somethin’” hostess stamp set. I hope you were lucky enough to earn that level 2 set as a hostess in 2009.  

Enjoy!

kealsiggy

Sunday, January 24, 2010

Creating with Children

Have you ever shown a child one of your creative works of art?  They are always so impressed and excited about your project!  The joy and smiles show in their eyes and it always gives you such a great feeling of accomplishment, doesn’t it?  So remember when you have a child creating with you return the favor and let them know that they did a great job with their precious works of heart!

I had two events this week that involved children.  I had such a fabulous time because the children were so excited to have the time to craft and spend time with each other! There were squeals of delight, big smiles and giggles throughout our stamping time together.  Now I think that sounds a little bit like us stampers when we get together too!  I guess that means we never grow out of the fun times!  Don’t forget to involve your children or someone else’s when you craft the next time…your world will definitely be changed for the better!

Here are photos of the projects I created this past week for these fun events. Parents helped with all aspects of these projects and no stamps, or ink pads were hurt or damaged in the making of these projects.  ;) Feel free to click on any photo to view a larger photo.

Valentine Fun

Recipe – Valentines Day
Stamps:
Fundamental Phrases, I {Love} Love Wheel, Extreme Elements
Inks:  Real Red, Pretty in Pink, Chocolate Chip
Paper: Real Red, Pretty in Pink, Whisper White, Sending Love Specialty Designer Series Paper
Accessories: Heart punch, Heart to Heart Punch, Stamping Up! Scalloped Heart of Hearts Embosslit

Happy Birthday Molly

Recipe – Happy Birthday Molly
Stamps:
I {Love} Love Wheel, Fundamental Phrases, Love You Much, Love Bandit
Inks:  Real Red, Pretty in Pink, Basic Black 
Paper: Real Red, Pretty in Pink, Whisper White, Sending Love Specialty Designer Series Paper
Accessories: Real Red Marker, Punches – Small Heart, Scallop Circle, 1-1/4” Circle, 1-13/8 Circle, Heart, Heart to Heart, and corner punch, Stamping Up! Scalloped Heart of Hearts Embosslit, Real red 1/4” grosgrain ribbon, stampin’ dimensionals, red satin ribbon, clips assortment

Enjoy!

kealsiggy

Friday, October 30, 2009

Goblins, Ghouls and Spooky Embellishments

Don’t be surprised that that you won’t see any stamping today.  Believe it or not I do have some other talents hidden away.  LOL!  This past weekend, I created a Halloween costume for my little ghoul!  I am not sure if I can say little now that he turned 9! Don’t you just love his “Yes, I am dead”, face?

Halloween 2009 Ghoul

It is truly amazing that although I didn’t use any stamps, I did use some of my Stampin’ Up! products on his costume!  Did you know that the Black Grosgrain Ribbon was just perfect to tie his ghoulish black hooded robe around his neck?  I bet you wouldn’t even think of sponges at Halloween would you?  Well, the Stampin’ Up! sponges cut into wedges was the perfect tool to create this ghoulish face!

Halloween 2009 Vampire

Wishing you loads of Halloween fun!

   kealsiggy

Tuesday, July 28, 2009

Celebrating 40 years - Ruby Anniversary


So there are many ways to create a card, but when it is something special a whole lot of time and effort go into making that perfect card that you hope will become a keepsake.


The Keal-side of my family are celebrating 40 years of married life together this coming weekend! What a wonderful occassion to celebrate and we are lucky to be spending it together!


Now, I am sure you can imagine how this went..."Linda, you are in charge of the card." I am sure many of you cardmakers are given the same types of orders...oops I mean requests by your family and friends. LOL!


This card took me almost 4 hours - contemplating what would be perfect for this creation. So don't feel bad if it takes you a bit of time to create that perfect creation when it is for a special event. Easy cards are fun to create...but it is also fun to put the love and time into your card when it is for someone special.


Recipe

Stamps: Flores Suaves (Celebrando Creatividad), Matchbox Messages, Simple Serif Numbers and Letters (Retired), Woodgrain background stamp, Teeny Tiny Wishes See why it is important to have lots of stamp sets? HeeHee

Paper: Soft Suede, Ruby Red, Very Vanilla

Ink: Soft Suede, Ruby Red

Accessories: Paper Snips, Kraft Taffeta Ribbon, Soft Suede Polk Dot Ribbon, sponge daubers, build-a-brad, Ruby Red Marker, Ruby Red Reinker, Wire Works (Retired), Paper Piercer, 1/2" Circle Punch, Sticky Strip, Dimensionals


I made the butterfly bodies by wrapping the wire around the end of the paper piercer and feeding one end back through the body to create the antenae.


Enjoy!