 Well, I am glad that you liked the double flap Cherry Cheesecake inspired card box that I created last week! I made this card box with simplicity in mind. Numbers are all the rage right now, so I figured what a great way to make an any occasion card set! This set contains 6 cards with envelopes. These 6 cards took all of 10 minutes
 to create and I even used a Stamp-a-ma-jig!
How did I make that card box? You’ll need the following supplies to get started: Paper Snips, a paper cutter with a scoring blade, sticky strip and cardstock or Designer Series Paper. Tip: Designer Series Paper is great to work with when you want to create a completely decorated card box, however, the text-weight paper is thinner and creates for a weaker box. Using Stampin’ Up! heavier weight cardstock 80lb or greater will make for a sturdier card box. Think about the recipient when choosing the type of paper you select.
You’ll need to start with a piece of cardstock that is 6” x 11”. Place your paper into the Paper cutter with the 11” side on the horizontal or at the top. You’ll be scoring at the following measurements (Do not remove the paper until you score each of these lines): 3”, 3-3/4”, 8-1/4. and 9”. Lines are drawn in pencil so that you can visually see where you will need to score. Click on any photo for a larger version. Tip: The more accurate you are with your score lines the better the box will connect together.  Now turn your paper so that the 6” side is on the horizontal or at the top. You’ll be scoring at 3/4” and 5-1/4” OR if it is easier for you, you’ll want to make sure you have 3/4” score line on each of the vertical edges.
  Next, you’ll want to make eight, 3/4” snips to the score lines as shown in the photo to create 4 tabs. Fold in tabs only.
 I suggest using sticky strip, as it creates a good strong hold when creating boxes. Place two strips on each tab.
 Fold along all remaining score lines. You’ll be able to see how your box will be coming together. You’ll be creating your bottom fold by securing the tab to the bottom sides of the box.
  Do the same to the top, by securing the tabs to the top section of the box. You’ll have two pieces of scored pieces in the middle section of the box that are not connected to anything. These form the sides and stabilize the box when closed.
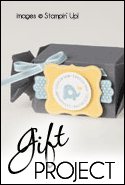
 Decorate as desired. Create a belly band or secure with ribbon, twine or any other materials you may have. The smaller flap was the top of the box and the larger flap was the bottom. As the box is square you can use the double-flaps as sides too! You’ll have about 1/2” of overlap between the flaps. I secured mine with
  a ribbon and a 1” circle glass fragment that uses the same numbering as the cards. The cardstock image was secured to the glass fragment with crystal effects. I used Jet black stazon to prevent smearing of the ink. A piece of retired hodgepodge hardware was secured to the back of the element with Tombow multipurpose adhesive so that it would “hang” from the ribbon. The element can be used as a charm for a Simply Adorned bracelet or a necklace. A great reusable piece. I love gifts that keep on giving don’t you?
Stamps: Clearly For You
Papers: Sweat Pea Paper Pack (Retired), Whisper White
Ink: Jet Black Stazon
Accessories: 5/8” Organza Ribbon, Round Glass Fragment, 1” Circle Punch, Hodgepodge Hardware(Retired)
Tools: Stamp-a-ma-jig, Paper Cutter with Scoring Tool, Tombow Multipurpose Adhesive, Sticky Strip
Techniques Used: n/a
Thanks for visiting! Enjoy!


Love your card and box!
ReplyDeleteBethany Barnard