Monday, October 5, 2009

Trick or Treat

Welcome to day three of my week of Holiday Haunts! 

These little gems were created using the Fancy Favor Big Shot Die.  Another rather quick and easy project that includes the wonderful little treat cups found in the Holiday Mini Catalog! 

A fun little trick that I discovered when cutting these boxes is that you can actually use an 8 1/2 sheet of paper to create one box…so even if you have run out of the 12 x 12 in the color you need…don’t fear you can make it work with the smaller size sheet!

The great thing about holidays is that many candy manufacturers create specialty candy for the holidays.  These little skulls, bones and pumpkins were the perfect accompaniment to the little treat bag.

Halloween Projects 005 

Recipe
Stamps: Sweet Centers (Mini),  
Paper: Cast-a-Spell Designer Series Paper, Basic Black
Ink:  Jet Black Stazon
Accessories: Treat Cups (Mini), 1-1/4” Striped Grosgrain: Old Olive, Basic Black and Pumpkin Pie, Horizontal Slot Punch

Enjoy!

kealsiggy

Sunday, October 4, 2009

Halloween Spice

Welcome back! This is day 2 of my Holiday Haunts projects!  If you have missed a day make sure you go back to check out the previous days projects.

I love creating cards, but sometimes events call for a 3D item!  Halloween parties often involve special projects that can hold a special candy surprise inside.  This little tombstone style matchbox can hold a bit of candy corn, a little candy bar, cash or “body parts”!  I found gummy “body parts” at a local grocery store…they fit perfectly in this matchbox!  Who wouldn’t just howl when they found a nose, a brain, a foot or a finger upon opening this little box of Halloween fun!

Holiday Haunts Camp - Matchbox

Creating projects with Big Shot Dies cuts your creation time down to minutes!  How many Matchboxes can you cut in 5 minutes?

Have some fun spicing up your next holiday project! Hope to see you back here tomorrow for some more Halloween fun!

Recipe
Stamps: From the Crypt, Sanded(Background), Teeny Tiny Wishes 
Paper: Basic Gray, Rich Razzleberry
Ink:  Basic Gray, Rich Razzleberry
Accessories: Big Shot Die Cut Machine, Extended Cutting Pads, Stampin’ UP! Matchbox Die, Paper Snips, Dimensionals

Enjoy!

kealsiggy

Saturday, October 3, 2009

Hauntingly Fun

Halloween is one of those holidays that allow you to decorate with bats and spiders even though the rest of the year you would scream and run for the vacuum or a broom if you saw them in your home!  In fact, the huge hairy, 20-million-eyed spider I saw today was dead in its tracks when I came upon it today – literally!  LOL! 

I thought you might like to see a couple of the projects that I created for my Holiday Haunts stamp camp this past month.  I will be posting 1 project each day for the next 6 days.  I hope it inspires you to create your own Halloween fun this year! The projects will increase in difficulty as we progress through the days.

Cards are a quick and easy projects to get that cauldron of ideas flowing.  These cards are perfect, sweet and simple ideas to let the little and big kids in your life know that you are thinking about them at this time of year!  I love creating in different colors – don’t you just love mixing up concoctions of colors?Holiday Haunts Camp - Cards

Recipe
Stamps: Baroque Motifs, Holiday Best (Hostess) 
Paper: Cast-a-Spell Designer Series Paper, Old Olive, Pumpkin Pie, Perfect Plum, Whisper White
Ink:  Old Olive, Pumpkin Pie, Perfect Plum
Accessories: Stampin’ Write Markers: Old Olive, Perfect Plum, Pumpkin Pie, Dimensionals, Ribbon Originals – Orchard, Tombow Multipurpuse Adhesive

Enjoy!

kealsiggy

Tuesday, September 1, 2009

Stampin’ Addicts Holiday Mini Blog Tour

    Stampin' Addicts Holiday Mini Blog Tour

Welcome to stop #20 of the Stampin' Addicts Happy Holidays Blog Tour! I will be showcasing the beautiful Charming stamp set shown on page 32 of Stampin’ UP!’s Holiday Mini. This tour will take you through more than 20 different blogs to showcase many of the new and exciting products in the new Stampin' Up! Holiday Mini Catalog. These products will be available for order starting September 1.

This tour runs from Saturday, August 29 to Monday, August 31.

If you've come here via Paula’s blog, I am sure you were thrilled with her great ideas for the Decor Elements & Wood Blocks….it gives me the inspiration I need to create the ones I have here at my home already!  If you're just jumping on from here, have no worries! The tour will circle around to the beginning, so you can see all of the wonderful and inspiring projects!

You may click on any of the photos to view a larger version.

Mini Box with Mini MedallionIt may be easy to miss the Charming stamp set in the Holiday Mini, but it is ideally sized to make elegant jewelry within the exclusive line of Simply Adorned Charms.  Even though I didn’t have the Charms to create with, I found this set wonderful to use with our Hodgepodge Hardware accents and our Pretties Kit due to its size and stylish images. 

My first project is a tiny 1.5” x 4.75” x 1” self-designed box. A bottle cap attached to the underside of the Hodgepodge Hardware is inset within the box top and holds the mini medallion image.  The hardware is flush with the top and the bottle cap actually sits within a 1 1/4” hole in the box top. I love the look this creates when viewing the image within the hardware!

Recipe
Stamps: Charming
Paper: More Mustard, Soft Suede, The Write Stuff Specialty Designer Series Paper, Whisper White
Ink:  Chocolate Chip, Chocolate Chip Craft
Accessories: Hodgepodge Hardware, Mistletoe Ribbon Originals, Soft Suede, More Mustard, Old Olive – Markers, Paper Snips, Crystal Effects, 1” Circle Punch, 1 1/4” Circle Punch, Dimensionals, Clear Embossing Powder, Fire Circle Rhinestone Brad (Disassembled), Bottle Cap (Recycled)

Medallions Galore

My second project is a 4” x 4” card.  I was inspired by the Simply Adorned Charms. I created my own, “necklace” that I attached to this little card.  The Hodgepodge Hardware was distressed until it became almost Kraft colored.  I love the final result!

Recipe
Stamps: Charming, Medallion
Paper: Kraft, Elegant Eggplant, Old Olive
Ink:  Elegant Eggplant, Old Olive, Old Olive Craft, Chocolate Chip Craft (to distress the hodgepodge)
Accessories: Hodgepodge Hardware - Vanilla, Kraft Taffeta Ribbon, 1” Circle Punch, 3/4” Circle Punch, Corner Rounder, Dimensionals, Clear Embosssing Powder, Sponge, Sanding Blocks

My final project is another self-designed box that can contain a special surprise inside.  The lid is attached so that upon closing you have an enclosed little gift box to give any special little embellishments or treats.  The box lid is perfect for pouring out these embellishments when it is time to create!
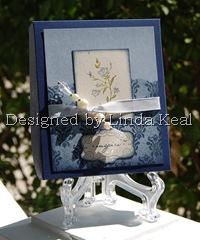
 Box of Inspiration - ClosedBox of Inspiration - Open

Recipe
Stamps: Charming, Itty Bitty Backgrounds
Paper: Night of Navy, Bordering Blue, Naturals Ivory 
Ink:  Night of Navy, Bordering Blue
Accessories: Pretties Kit, Whisper White Taffeta Ribbon, Bordering Blue Reinker, Stamp-a-ma-jig, Sponge, Bordering Blue, Night of Navy and Old Olive Markers, Wire

I hope you enjoyed my stamped creations using the Charming stamp set! Use the arrows below to navigate to the next stop on our tour, where Barbara will be showcasing yet another great item from the Holiday Mini Catalog – the Simply Adorned Charms – the perfect accompaniments to the Charming stamp set!

These links will remain active until 11:59PM PST on Monday, August 31st.

Enjoy!

Previous BlogNext Blog

kealsiggy

Tuesday, July 28, 2009

Celebrating 40 years - Ruby Anniversary


So there are many ways to create a card, but when it is something special a whole lot of time and effort go into making that perfect card that you hope will become a keepsake.


The Keal-side of my family are celebrating 40 years of married life together this coming weekend! What a wonderful occassion to celebrate and we are lucky to be spending it together!


Now, I am sure you can imagine how this went..."Linda, you are in charge of the card." I am sure many of you cardmakers are given the same types of orders...oops I mean requests by your family and friends. LOL!


This card took me almost 4 hours - contemplating what would be perfect for this creation. So don't feel bad if it takes you a bit of time to create that perfect creation when it is for a special event. Easy cards are fun to create...but it is also fun to put the love and time into your card when it is for someone special.


Recipe

Stamps: Flores Suaves (Celebrando Creatividad), Matchbox Messages, Simple Serif Numbers and Letters (Retired), Woodgrain background stamp, Teeny Tiny Wishes See why it is important to have lots of stamp sets? HeeHee

Paper: Soft Suede, Ruby Red, Very Vanilla

Ink: Soft Suede, Ruby Red

Accessories: Paper Snips, Kraft Taffeta Ribbon, Soft Suede Polk Dot Ribbon, sponge daubers, build-a-brad, Ruby Red Marker, Ruby Red Reinker, Wire Works (Retired), Paper Piercer, 1/2" Circle Punch, Sticky Strip, Dimensionals


I made the butterfly bodies by wrapping the wire around the end of the paper piercer and feeding one end back through the body to create the antenae.


Enjoy!

Saturday, July 11, 2009

One Hot Summer Day


I know it has been some time since I have been here, but with a crazy schedule, Noah being home from school and vacation...I have been caught up in family fun! These past few days I have been busy designing for my upcoming classes and clubs. I am giving you a sneak peak of one of my upcoming club projects for my July and August gem clubs. If you like what you see and you are not a member of one of my hostess clubs then contact me today. I have some current openings that are sure to fit your schedule!


This project is a cute little 3D treat holder that I used for this project. I saw the ice cream cone idea at Theresa Momber's blog, Crafting The Web. This project can easily accomodate 3 x 3 mini cards too! A cello bag is all you'll need to package up your little gift. (Don't get any ideas about putting ice cream in it!) LOL! I hope you like this project as much as I do!